
Exciting project for collecting and displaying statistics
At first, interviews seemed like a no brainer. It's a great way to offer unique content, engauge with the community, and potentially give a voice to people who might otherwise not speak out that much (ie humble developers in the trenches), along with a long list of other benefits. However, pretty quickly things started to spiral when the reality started to hit home and scope creep started, well creeping in. Now in some cases, I will simply email the respondent the questions, or DM them on x.com or whatever. Being a software company, it only seemed natural that there would be an online portal allowing them to submit their responses directly to us as well.
It was for this reason, that the interview idea was put on the back burner. Once Statamic became a little more clear to me, and the site was coming together, I knew it was time to finally get a version 1.0 out, at least an MVP build.
The task is really straightforward, questions need to be able to be asked and answered. Now things get a little more complicated when you decided "who" is going to be answering them, is it going to be anonymous responders for a survey type poll, or is this going to be targeted questions directed at a specific individual?
The Requirements
- Targeted interview forms where a specific person is given a link that works 1 time for them
- Survey type response forms that numerous people can answer w/ minimal identifying info
- Turn interview forms 'on and off' manually and automatically
- Notify both parties upon completion (if provided email them, otherwise on page info)
- Create the Interview from simple markdown document.
- Allow for questions as well as intro paragraph
Resulting System Architecture
The Interview System is a comprehensive Laravel-based solution for creating, managing, and capturing interview responses. It consists of three main components:
- Interview Creation & Management (Laravel/Livewire Admin Panel)
- Interview Form Rendering (Dynamic YAML-based forms)
- Response Capture & Display (Statamic Integration)
┌─────────────────┐    ┌──────────────────┐    ┌─────────────────┐
│   Admin Panel   │───▶│   YAML Forms     │───▶│   Public Forms  │
│   (Livewire)    │    │   (Storage)      │    │   (Views)       │
└─────────────────┘    └──────────────────┘    └─────────────────┘
         │                       │                       │
         ▼                       ▼                       ▼
┌─────────────────┐    ┌──────────────────┐    ┌─────────────────┐
│   Database      │    │   Form Schema    │    │   Submissions   │
│   (Metadata)    │    │   (Structure)    │    │   (Responses)   │
└─────────────────┘    └──────────────────┘    └─────────────────┘
1| Creation Process
Starting in the Admin Dashboard, an Interviewer creates a new interview using a pretty basic set of requirements.
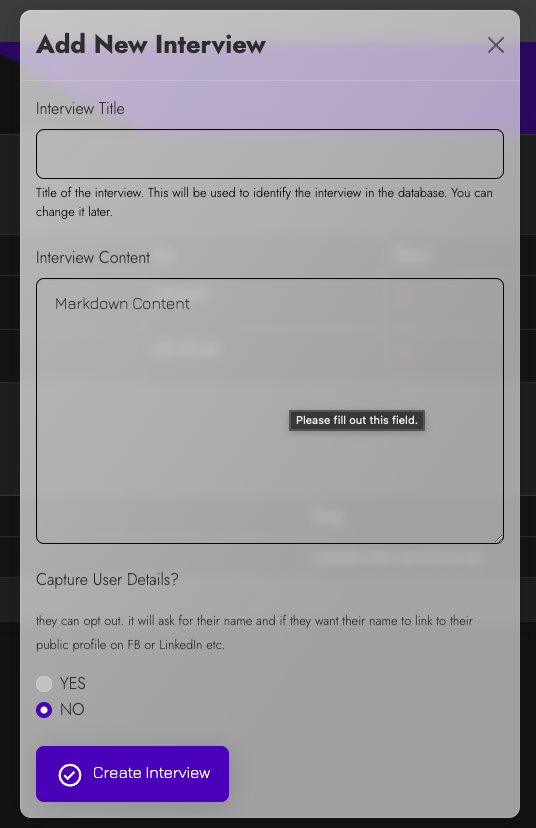
Questions File Format
The main textarea gets populated with some really basic markdown content that we turn into a form later.
## Overview
This is optional
QUESTIONS
-
Do you use any AI-powered IDEs (Cursor) or add o AI plugins (like GitHub Copilot or IntelliJ’s AI Assistant)?
If so, how have these tools changed the speed or quality of your code output?
-
Have you ever ...
Transforming the interview questions text into a working HTML Form is done in two parts. First the Markdown is stripped and formatted into a set of YAML instructions. Later the blade uses Spatie to generate HTML form elements from the YAML.
// app/Services/MarkdownToYamlConverter.php
public function convertToYaml(string $markdownContent): string
{
    // Validates markdown structure
    if (!preg_match('/^#\s+.+/m', $markdownContent)) {
        throw new \Exception("Markdown content must start with a title (H1 heading)");
    }
// Parses sections: Overview, QUESTIONS

if ($currentSection === 'QUESTIONS') {
 if (preg_match('/^\d+\.\s+(.+)$/', $line, $matches)) {
   // Start a new question
   if ($currentQuestion) {
     $questions[] = $currentQuestion;
   }
   $currentQuestion = $matches[1];
 } elseif (!empty($line) && $currentQuestion) {
   // Append follow-up question or additional text
   $currentQuestion .= ' ' . $line;
 }
}

// continues ...
}
You'll notice that we are using a Service, to do this. That was a repeated recommendation from Claude and Grok even tho its not really standard Laravel. I really like it tho so I just let AI do its thing.
The other really cool portion of this step is the fact we are using a Livewire component to create the interview. This is a little different than a typical form post to a defined route, and instead our submit function in our Livewire class AddInterviewFormModal uses that conversion when creating a new interview form
public function submit()
  {
    $this->validate();
try {
  $newKey = HuiHelp::generateReadableString();
  $converter = new MarkdownToYamlConverter();
  $yamlContent = $converter->convertToYaml($this->content);

  // Saves the YAML file to storage
  Storage::put('interviews/' . $newKey . '.yaml', $yamlContent);

  // Save the interview entry in the database for updating w/ responses later
  InterviewForm::create([
    'title' => $this->title,
    'content' => $this->content,
    'capture_user_details' => $this->captureUserDetails,
    'link_key' => $newKey,
  ]);

  $this->reset(['title', 'content', 'captureUserDetails', 'error']);
  $this->dispatch('interviewAdded');
  $this->dispatch('close-modal');
} catch (\Exception $e) {
  $this->error = 'Failed to create interview: ' . $e->getMessage();
}

}
There are two different objects created here, the YAML file that has the questions and data needed to render the form, and then an entry in the database that we can later attach responses to. You could just stash the compiled YAML in the DB as well, and not stick it into a file, but for now I have it as its own file.
2| Displaying the interview to the interviewee
This is the most important step to get right. People are not going to appreciate having their time wasted if your interview form does not work good, is janky, or makes it difficult for them to use. That is why it was really really important to me that this page be as bulletproof and as simple as possible, while offering a seamless, fluid user experience.
This is where we head over to the InterviewsController and get to work preparing the view. A LOT of the heavy lifting is done via the Symphony Package Symfony\Component\Yaml, it really does a great job.
// app/Http/Controllers/InterviewsController.php
public function take(string $linkKey)
{
// 1. Find interview in database
$interview = InterviewForm::where('link_key', $linkKey)->first();
// 2. Load YAML form definition
$yamlPath = 'interviews/' . $linkKey . '.yaml';
$form = Yaml::parse(Storage::get($yamlPath));

// 3. Render dynamic form
return view('interviews.take', [
    'interview' => $interview,
    'linkKey' => $linkKey,
    'form' => $form,
]);

}
The Interview Form & Capturing Responses
The blade template really nails it here. It's incredibly simple and there is not much else to say about it, other than, "it just works ™️".
@foreach ($form['form']['fields'] as $field)
<div class="mb-3">
@if ($field['type'] === 'text')
    <label for="{{ $field['name'] }}" class="form-label my-2">{{ $field['label'] }}</label>
    <input type="text" name="{{ $field['name'] }}" id="{{ $field['name'] }}"
        class="form-control @error($field['name']) is-invalid @enderror"
        value="{{ old($field['name']) }}"
        {{ isset($field['required']) && $field['required'] ? 'required' : '' }}>
    @error($field['name'])
        <div class="invalid-feedback">{{ $message }}</div>
    @enderror
@elseif ($field['type'] === 'email')
      ...
@endif
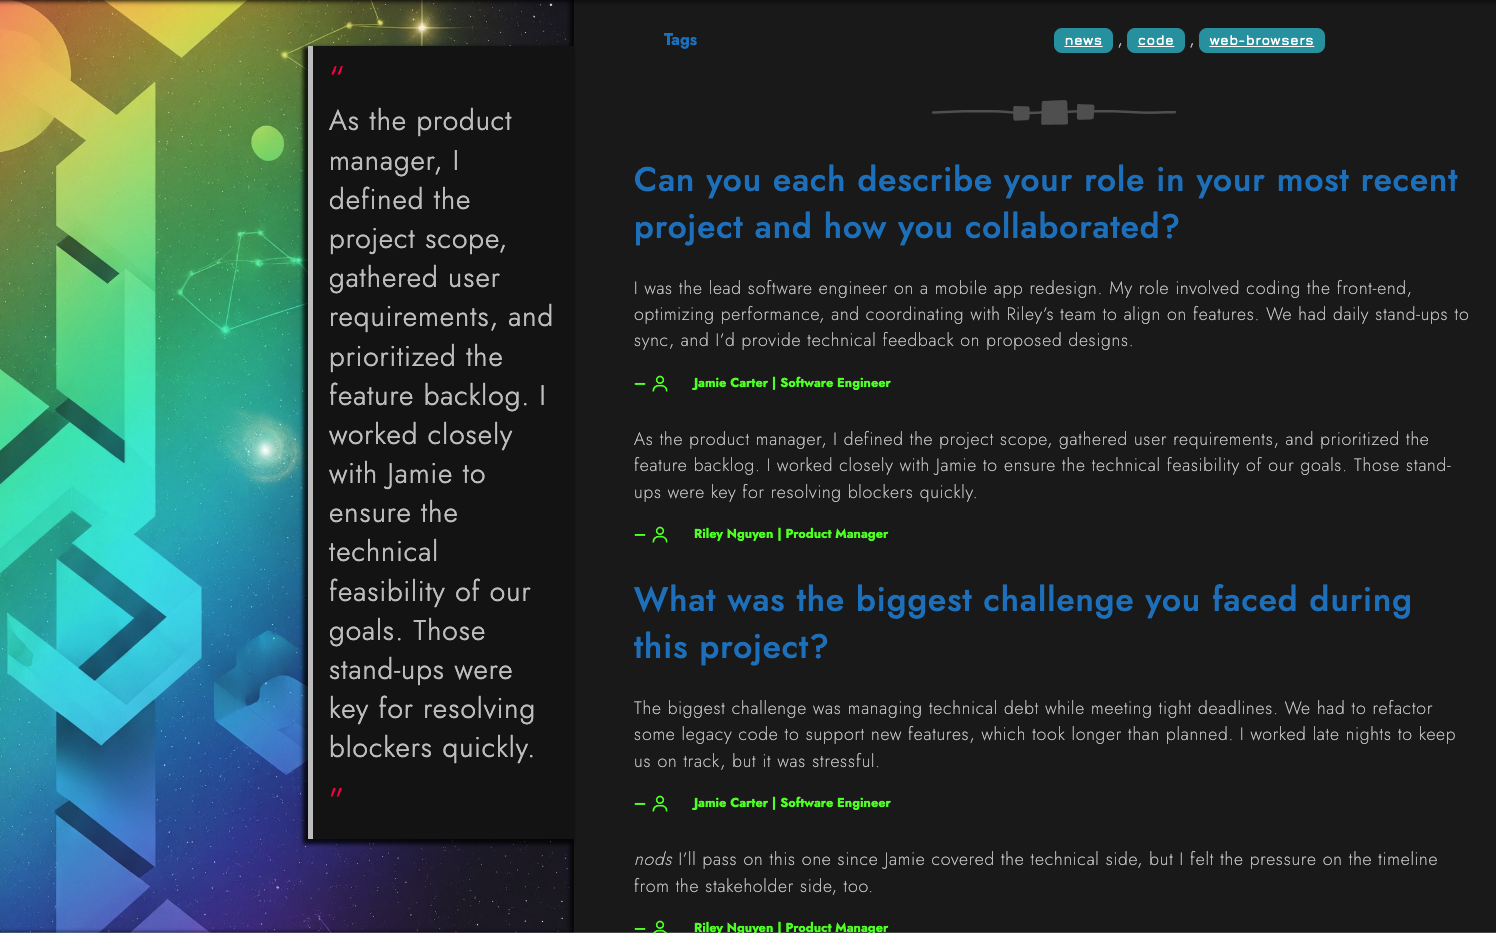
3| Displaying the Final Interview w/ Statamic
Once the responses have been fed into the awesome Statamic transcript UI, we have a nicely formatted interview that we can easily render. The reason for this post, and highlighting the interview section specifically, is that interviews are WAY more complicated than is used to display a traditional blog posts. The biggest difference is that interviews have a unknown number of Q & A Blocks, where 1 person asks a question and potentially multiple people respond, potentially multiple times. All of these different aspects, the who said what to whom, have to be captured and represented in the UI.
Here is a look at how 1 individual Q & A Block looks. You can just imagine this repeating down the page as more and more questions are asked and answered.
@foreach ($interview->transcript as $index => $qa_block)
...
<div class="qa-block mb-4">
{{-- Question --}}
<div class="question mb-3" aria-labelledby="q{{ $index }}">
<div id="q{{ $index }}" class="question text-info">
{!! $qa_block['question'] !!}
</div>
</div>
{{-- Responses | Note can have multiple respondents for 1 answer --}}
@foreach ($qa_block['responses'] as $response)
<div class="response mb-4">
<div class="response-content">
{!! $response['response_text'] !!}
</div>
@if ($response['pull_quote'])
<blockquote class="pull-quote">
{!! $response['response_text'] !!}
</blockquote>
@endif
@if ($response['respondent'])
@foreach ($response['respondent'] as $respondent)
<div class="respondent mt-2">
<small class="text-success fw-bold">
— <x-bx-user class="bx bx-sm mr-3" />{{ $respondent->title }}
</small>
</div>
@endforeach
@endif
</div>
@endforeach
</div>
...
@endforeach
Now I might be a bit biased but I think the final result is pretty freaking sweet.


Comments
Add Comment
All Comments
// NO_COMMENTS_IN_BUFFER
Establish initialization protocol by creating the baseline entry trace.
System Moderation Interceptor is ON for this communication hub. All user transmission vectors must clear access protocol filtration approvals before broadcasting logs live to public network arrays.